In today’s world, images play a crucial role in our lives. However, it’s rare to witness a photo that has not been manipulated using photo editing tools.
Whether to enhance the picture quality or create a specific visual aesthetic, photo editing has become part and parcel of modern-day photography.
There’s no need to worry if you want to capture inspiring or moving images that match the professional standard.
With the user-friendly photo editing tools available in the Picsart app or on the Picsart web, anyone can achieve impressive results without spending a fortune on complicated software such as Adobe Photoshop or Lightroom.
This guide will provide all the essential information you need to get started with photo editing. So, let’s dive right in and learn how to enhance your pictures easily.
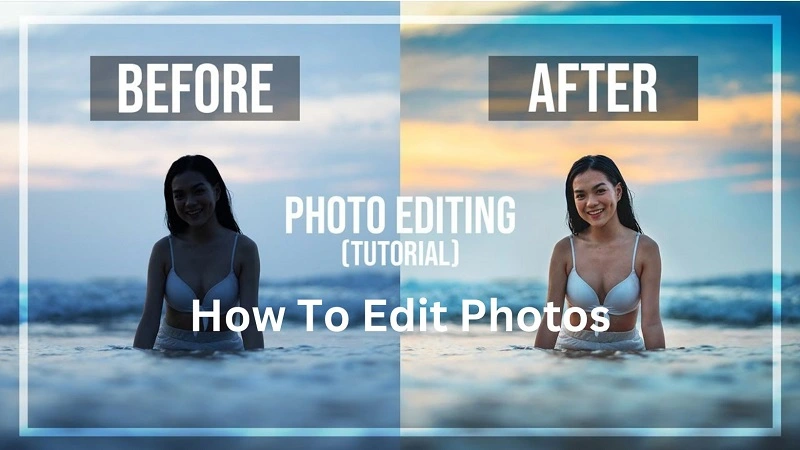
LEARN HOW TO EDIT PHOTOS
Discovering the art of photography may seem overwhelming at first, but it doesn’t have to be a daunting experience.
With the appropriate tools for photo editing and a positive mindset, you can enhance your abilities in no time. However, where can you find the appropriate tools and guidance for editing your photographs?
In today’s era of digital photography, your go-to source of information is none other than YouTube.
In conclusion, learning the ropes of photography and photo editing can be an effortless experience with the right tools and resources, and YouTube is an exceptional resource for starting.
Explore the platform to find the perfect tutorial that caters to your needs and helps you polish your skills.
WHAT ARE THE BASICS OF PHOTO EDITING?
You can transform your ordinary pictures into stunning visual representations by gaining expertise in these fundamental photo editing tools.
Once you have learned these basic editing features, you can share some magnificent photographs with your audience.
Crops Tool
The Crop tool may seem like a basic photo editing feature, but it is an essential tool that can significantly enhance your photographs.
With Crop, you can adjust the framing of your image, which can be immensely useful when preparing a photo for social media, where specific dimensions are required.
For instance, if you post a picture on Instagram and need it to conform to the classic 1:1 ratio popular on the platform, you can use the Crop tool to achieve this.
Furthermore, the Crop tool can be an excellent tool for highlighting the composition of your picture.
By adjusting its framing, you can draw attention to the most vital elements in the image and remove any unnecessary distractions.
This simple tool can make a significant difference in the overall composition of your photograph, and it’s worth mastering to enhance your skills as a photographer.
Straighten
Like the Crop tool, the Straighten feature is another fundamental but immensely useful photo editing tool. When taking photos with a smartphone, it can be challenging to achieve the perfect angles.
An otherwise fantastic picture can be marred by a slight tilt to the left or right or a perspective captured from below or above.
The Straighten tool is handy in such cases, allowing you to make subtle adjustments to your photo’s angles to make them level and visually appealing.
Using the Straighten tool, you can correct the distortion caused by the camera’s lens or your shooting angle and create a more pleasing composition.
Whether you want to straighten a horizon, a building, or a person’s posture, this tool can help you achieve your desired results effortlessly.
Brightness
In photography, lighting is crucial in determining the mood and level of detail captured in an image. Unfortunately, controlling lighting when taking photos with a phone camera can be challenging.
While professional photographers using DSLRs can adjust lighting settings manually, most phone cameras lack this feature.
If you’ve already taken a photo and need to adjust the lighting, the Brightness tool is your friend. It can help you adjust the amount of light in your image, making it look more appealing and natural.
Contrast
Have you ever felt your pictures lacked the boldness and brightness you envisioned? Worry not; the Contrast tool can help you achieve that desired effect.
By tweaking the contrast, you can intensify the highlights and shadows in an image, giving it a more striking and captivating look.
Alternatively, you can reduce the contrast if you want a more subdued and toned-down appearance.
The Contrast tool significantly enhances your photos with just a few simple editsTop of Form.
Saturation
When it comes to enhancing the drama and impact of a picture, the Contrast and Saturation tools can work together in harmony.
While Contrast adjusts an image’s light and dark tones, Saturation focuses on the color. If you increase the Saturation of an image, you’ll bring out the colors, making them brighter and more vibrant.
Conversely, if you decrease the Saturation, your photo will look muted and even grayscale.
By combining the power of these two tools, you can create truly stunning and captivating images.
Clarity
It can be challenging to achieve sharp and detailed images when capturing photographs using a smartphone camera or a less advanced lens.
That’s where the Clarity tool can help you enhance your pictures’ quality. By adjusting the clarity of your image, you can enhance its sharpness and make the details stand out.
Whether you need to bring out the text in your image or fix the bad lighting, the Clarity tool is an excellent option to improve the overall quality of your photo.
Shadows
As a photo editor, it’s essential to understand how different elements in a picture come together to create its overall effect.
One critical aspect to consider is the shadow interplay within the image. With the Shadows tool, you can adjust the darker tones of a photo to create a more striking or subtle aesthetic.
Amplifying the shadows can add depth and drama to your image, while reducing them can produce a softer, more delicate look.
So, don’t overlook the power of the Shadows tool when it comes to photo editing.
Highlights
The Highlights tool is similar to the Shadows tool but adjusts the brighter tones in an image instead of the darker ones.
This tool can be useful when dealing with over-exposed photos, as it can reduce glare and bring more balance to the image.
Conversely, if you have an image that is too dark, you can use the Highlights tool to reveal hidden highlights and give the photo a more lively feel.
Temperature
The temperature of a photograph can drastically impact its atmosphere and style. With the Temperature tool, you can manipulate your image’s colors and white balance, making it warmer or cooler.
The warmth of an image is generally preferred on social media platforms as it evokes natural light and creates a pleasant sensation.
On the other hand, colder images are typically associated with editorial photographs or vintage styles like Polaroid pictures.
The Temperature tool can help you achieve stunning results whether you choose warmer or cooler tones.
It’s essential to strike the right balance that enhances and complements your subject.
How To Edit Photos For Instagram
Picsart provides a variety of photo overlays and adjustments to elevate the quality of your images before posting them on Instagram through your phone.
You can even remove the background of any image to make it transparent. Here are some of the most sought-after options.
Effects
Upon uploading an image to edit on the Picsart app, users can access the Effects gallery, which provides a diverse range of overlays to enhance their photos further.
One popular category within the gallery is FX, which offers classic effects that lend a subtle yet professional artistic quality to your photos.
Blur, Artistic, & Distort
The PicsArt app’s Blur, Artistic, and Distort collections offer unconventional overlays beyond the typical Instagram filters.
These effects can manipulate the focus of your images or add graphic changes to them. Distort, in particular, can transform your photos with some truly distinctive visual alterations.
To take your creativity to the next level, you can mix and match these effects and filters with the stickers and brushes in the Picsart app.
Paper
PicsArt’s Paper gallery contains effects different from the Artistic or Distort collections.
The overlays in Paper are subtle and delicate, adding a distinct texture to your photos, making them appear printed on fine art paper or canvas.
Pop Art & Colors
Andy Warhol’s pop art images have always been popular, and now with PicsArt’s Pop Art and Colors effects, you too can give your photos that iconic look.
With just a few taps, you can adjust the colors in your images and make them pop with character and style.
One interesting effect in this category is Color Splash, which highlights only one or a few colors in a photo while leaving the rest of the image in black and white.
Give your images a unique touch by experimenting with these fun effects.
Canvas & Sketch Effects
Picsart offers the Canvas and Sketch effects collections for those seeking a more artistic touch.
These effects are perfect for blending your photos with paintings and adding creative pencil strokes to your images.
The collections provide plenty of options to explore and experiment with, allowing you to find the perfect effect for your desired artistic style.
Related: A Guide To Edit And Changing Background In Picsart For Android
Photo Editing Tools: How To Crop An Image
Now that you have discovered the top photo editing tools and their functionalities, it’s time to put your skills to the test.
Start by cropping your image using Picsart’s easy-to-use interface.
Here’s how to do it:
- Install the Picsart app on your phone.
- Tap the “+” icon on the bottom toolbar to select the photo you want to crop.
- Click on the “Tools” icon on the bottom toolbar, and then select “Crop” to open the crop editing tool.
- You can use the pre-set size templates at the bottom of the screen to crop your image or manually crop it using your fingers.
- Once you are done, click on the “Apply” button in the top right corner of the screen.
Finally, save your cropped photo by clicking “Next” or the downward-facing arrow icon at the top.
You can produce engaging and professional-looking photos for Instagram and other platforms by mastering these easy editing steps.
So go ahead and experiment with the different tools available, and let your creativity run wild.
Related Articles:


